Every event for many years I end up bringing three of four little boxes and bags to lug all my personal stuff. Garb and feast gear have their designated totes, but items like belts, knives, hats, shoes, pouches, gaming boards and pieces, lanterns, skulls, a mirror, a throwing axe, etc. always seemed to end up just tossed in at the last minute. I've been wanting to build a decent chest for this stuff for a long time and I finally got around to it this weekend.
I decided I wanted a chest that looked like the Oseberg chest #178 which is a small, two foot long chest which was found in the Viking Oseberg ship burial in Norway containing either grain or apples and dated to about 800 AD. I wanted something all the previously listed stuff could fit in, but small enough to carry around, and if I could make it work, about the height of our Clann stools (~18") so I could use it as a seat as well. There's a
nice PDF on olvikthyng.org with pictures and descriptions of various Viking chest finds so you can see what real Viking chests look like. Googling will bring up a ton of Pinterest hits and none of them are well sourced. I didn't want to just copy someone elses copy, but ultimately thats pretty much what I did.
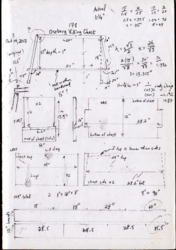
I decided to make the chest out of cheap pine and picked up two 8 foot long boards of what they call 1" (actually 3/4") by 12" (actually 11-1/4"). I found a bunch of different plans online to make a replica of the chest but I couldn't find any museum quality replica plans (perhaps I just didn't look hard enough). I wanted to make the chest appear as close to the original as I could, I wanted to employ the mortise and tenon join for the bottom board, but I planned to use screws to join the side boards, and while the original had a curved top (hollowed out log), I was going to have a flat board top.

- Plans for my chest from my little green project book
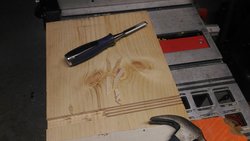
First I cut the end boards 18" long, and set the table saw at 10 degrees to cerf them at 11-1/4" about 3/8" deep where the bottom board would fit into it. I ran it through about 4 times moving the fence slightly each time (and doing both end boards this way), then I used a chisel to remove the remaining wood.

- Cerfing the end boards
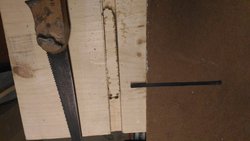
Then I measure out for the mortise which was going to be 6" long and drilled spotting holes at each corner. I didn't have a big enough coping saw but I used a tiny blade from one that was too small to start the cuts, then I used a keyhole saw to complete that job. I used a file to clean all that up.

- makeshift coping blade and keyhole saw
The end boards were cut down 3/4" on either side above the mortise with a back saw (really needed a taller one) so that the side boards would mate up flush against them. I designed the chest so that side and end boards were all the same height so the top board would sit flush on all of them (actually the end boards would need to be planed a bit to be really flush but they're close). I chose not to make the end boards higher than the side boards and have the top just sit directly on the back and front side boards as I'd seen in some plans because I was afraid the weak pine top would sag if someone sat on it.
I haven't linseed oiled it yet and I'm still looking for the hinges and clasp (Inar had some nice stuff at Summer Thyng) as well as handles for the end boards (can't decide on whether I want rope or metal handles).
Every event for many years I end up bringing three of four little boxes and bags to lug all my personal stuff. Garb and feast gear have their designated totes, but items like belts, knives, hats, shoes, pouches, gaming boards and pieces, lanterns, skulls, a mirror, a throwing axe, etc. always seemed to end up just tossed in at the last minute. I've been wanting to build a decent chest for this stuff for a long time and I finally got around to it this weekend.
I decided I wanted a chest that looked like the Oseberg chest #178 which is a small, two foot long chest which was found in the Viking Oseberg ship burial in Norway containing either grain or apples and dated to about 800 AD. I wanted something all the previously listed stuff could fit in, but small enough to carry around, and if I could make it work, about the height of our Clann stools (~18") so I could use it as a seat as well. There's a [url=http://www.olvikthing.org/wp-content/uploads/2014/07/Viking-Age-Furniture-6-152.pdf]nice PDF[/url] on olvikthyng.org with pictures and descriptions of various Viking chest finds so you can see what real Viking chests look like. Googling will bring up a ton of Pinterest hits and none of them are well sourced. I didn't want to just copy someone elses copy, but ultimately thats pretty much what I did.
I decided to make the chest out of cheap pine and picked up two 8 foot long boards of what they call 1" (actually 3/4") by 12" (actually 11-1/4"). I found a bunch of different plans online to make a replica of the chest but I couldn't find any museum quality replica plans (perhaps I just didn't look hard enough). I wanted to make the chest appear as close to the original as I could, I wanted to employ the mortise and tenon join for the bottom board, but I planned to use screws to join the side boards, and while the original had a curved top (hollowed out log), I was going to have a flat board top.
[attachment=0]Oseberg_notes.png[/attachment]
First I cut the end boards 18" long, and set the table saw at 10 degrees to cerf them at 11-1/4" about 3/8" deep where the bottom board would fit into it. I ran it through about 4 times moving the fence slightly each time (and doing both end boards this way), then I used a chisel to remove the remaining wood.
[attachment=5]P_20171015_111518.jpg[/attachment]
Then I measure out for the mortise which was going to be 6" long and drilled spotting holes at each corner. I didn't have a big enough coping saw but I used a tiny blade from one that was too small to start the cuts, then I used a keyhole saw to complete that job. I used a file to clean all that up.
[attachment=4]P_20171015_115417.jpg[/attachment]
The end boards were cut down 3/4" on either side above the mortise with a back saw (really needed a taller one) so that the side boards would mate up flush against them. I designed the chest so that side and end boards were all the same height so the top board would sit flush on all of them (actually the end boards would need to be planed a bit to be really flush but they're close). I chose not to make the end boards higher than the side boards and have the top just sit directly on the back and front side boards as I'd seen in some plans because I was afraid the weak pine top would sag if someone sat on it.
I haven't linseed oiled it yet and I'm still looking for the hinges and clasp (Inar had some nice stuff at Summer Thyng) as well as handles for the end boards (can't decide on whether I want rope or metal handles).
[attachment=1]P_20171015_153500.jpg[/attachment][attachment=2]P_20171015_153517.jpg[/attachment][attachment=3]P_20171015_153444.jpg[/attachment]